Guided Task: Implement and Test ConflictException
Implementing and test a custom Exception.
Learning Outcomes
- Implement and test a custom exception class
serialVersionUID Warning
Since the ConflictException class extends Exception, which implements the Serializable interface, the Java compiler will provide a warning about ConflictException lacking a serialVersionUID. An object and its state is serialized when the information about the object, including the current values in the fields are written to a file in a Java-specific format. Serialized files can then be deserialized or read in as Java objects. Serialization is a way of saving object state when an application is closed. Instead of using serialization, however, you are using specifically formatted files for saving state of our application.
One of the key items in serialization is that each object type requires a unique id so the serializier knows what object to work with when reading and writing Java objects. If you’re not planning to use serialization and you want to get rid of the compiler warning, you can use the default serialVersionUID of 1L (which is the value 1 stored into a long primitive type; a long takes twice the memory of an int). Use the Eclipse Quick Fix tool to create the default serialVersionUID. Make sure you comment the field. We suggest using the comment:
/** ID used for serialization. */
private static final long serialVersionUID = 1L;
Exception Constructors
Any custom Exception requires the author to create two constructors. The first is a parameterized constructor with a String specifying a message for the Exception object. The message is passed to the parent’s constructor. The second is a parameterless constructor that calls the parameterized constructor with an author specified default message. A custom Exception needs no additional state or behavior.
Write the two constructors for ConflictException. The default message should be "Schedule conflict.".
Creating a Test Class
In Guided Project 1, you created a test class directly in the test/ folder. Eclipse provides additional support for generating JUnit tests. Follow the steps below to create ConflictExceptionTest.
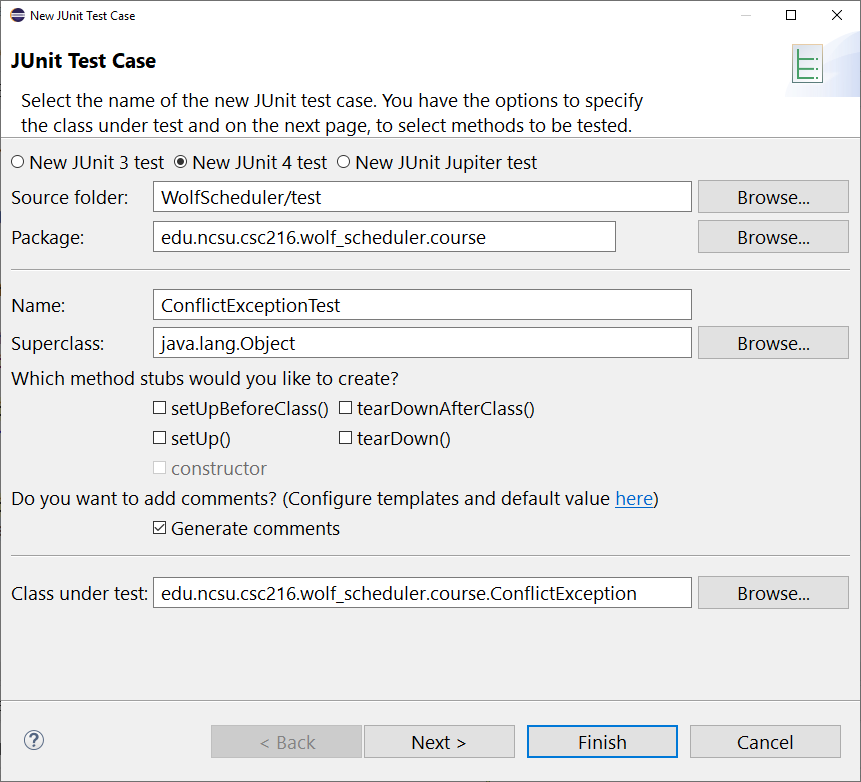
- Right click on
ConflictExceptionin the Package Explorer. Select New > JUnit Test Case. - Update the New JUnit Test Case wizard dialog with the following information:
- New JUnit 4 test should be selected
- Source folder:
WolfScheduler/test - Check Generate comments
- Click Next >. (If you click Finish that’s ok. You’ll have to either delete the class and start over or manually create the test methods.)
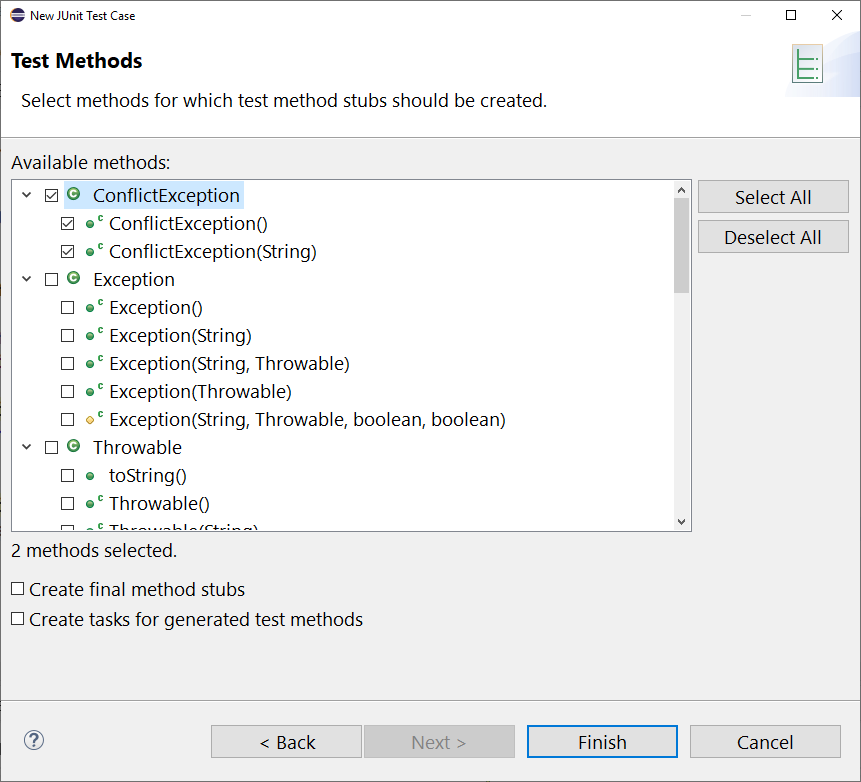
- The next page lets you select the test methods that you want to create from the methods in the class under test. For
ConflictExceptionTest, you want to test both constructors. CheckConflictException(String)andConflictException(). Then click Finish.
Writing Test Methods
When writing unit tests, you first need to think about the goals of the test. Most of ConflictException’s functionality is inherited from Exception. Since that parent class has been extensively tested by the Java API authors, you should focus your attention on what is different and custom about the child class - the new constructors! The tests will use the new constructors and verify that the correct message is available.
Below is the test case for the parameterized constructor:
@Test
public void testConflictExceptionString() {
    ConflictException ce = new ConflictException("Custom exception message");
    assertEquals("Custom exception message", ce.getMessage());
}
Write the test for the parameterless ConflictException constructor.
Comment ConflictException and ConflictExceptionTest
Javadoc both your ConflictException and the associated ConflictExceptionTest.
Run Your Tests
Run your new ConflictExceptionTest class and ensure the tests pass. You may need to update your ConflictException implementation or the tests until they pass.
Also, continue to run the other unit tests in your suite! Make sure they still pass, ensuring no regression in functionality.
Reference: Staging and Pushing to GitHub
GitHub Resources:
Check Your Progress
Complete the following tasks before pushing your work to GitHub.
- Make sure that all fields, methods, and constructors are commented.
- Resolve all static analysis notifications.
- Fix test failures.
- Commit and push your code changes with a meaningful commit message. Label your commit with “[Implementation]” and “[Test]” for future you!