Guided Task: Testing with Files
Now that you have the skeleton of CourseRecordIO, you’ll implement it to pass the tests in CourseRecordIOTest. As part of that, you’ll discover how to test file I/O.
Learning Outcomes
- Set up WolfScheduler for testing file I/O
Best Practice: Testing File I/O
Testing File Input
When testing file input functionality, you need files that test the valid input and files that test invalid input. The files may be broken down so that one distinct record is in each file or so that several valid/invalid records are in the same file. Distinct records are a little easier to debug since you can narrow down to a specific failing file, but finding a failing line in a larger file can be done by printing out each line and including print messages to help you debug and narrow to a specific problem line. Later this can be more easily accomplished with a debugger.
If you know what the file input is, you can check that the input generated the correct objects with the correct state for each object. That information can be part of your test case.
Testing File Output
When testing file output, you will be generating a file. You could read the generated file back in and compare with a String of expected results. Another option is to create a file that contains the expected results and compare that the two files are the same. CourseRecordIOTest does the latter and reads in both files and compares them line by line.
Changing Expected Files
If there is a possibility that a test or incorrect code under test may manipulate a file that is used for input in another test, you should make sure that you “reset” the test file before using in another test. To do that, you can maintain a file that contains the starting information and copy it into your test file before each test. CourseRecordIO.setUp() is an example of copying a starter file to an input file.
Setting up for File I/O Testing
You should keep your Eclipse projects organized. Folders keep random files from cluttering the top level of the project. When working with file I/O functionality, you need a place to store your test files. These test files are different than the *.csv files that we used for CourseTest. These test files are files that a user would provide as actual input to the program; they are not the contents of a parameterized test. Therefore, we’ll store these test files in a different location.
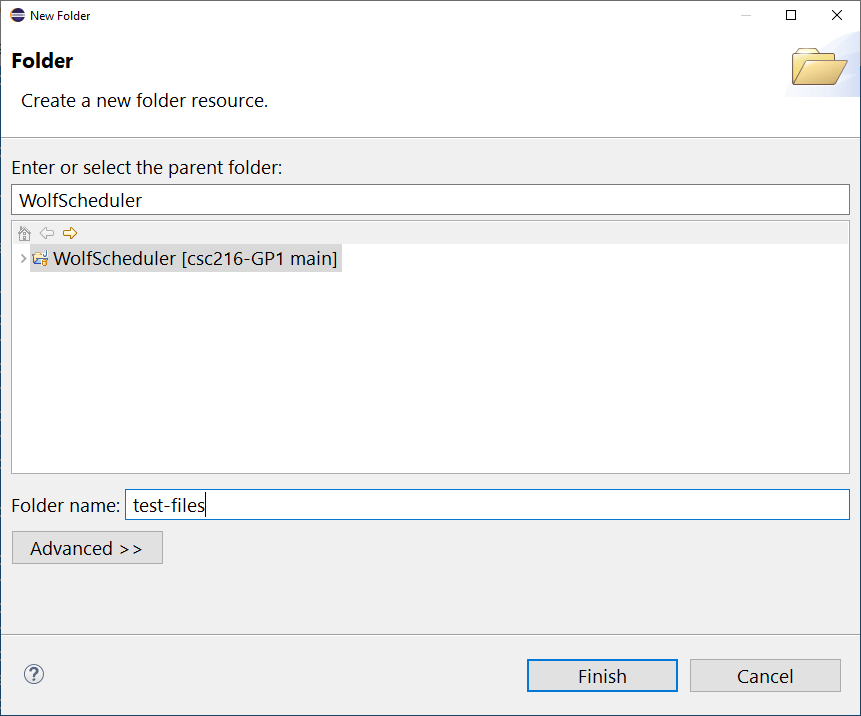
Create an Eclipse folder to store your test files by right clicking on the WolfScheduler project and selecting New > Folder. Name the folder test-files.
Creating Test Files
Right click on the link to download each of the provided files and copy the downloaded file into your Eclipse project test-files directory. DO NOT copy the text from the file into an empty text file. That will cause issues with encoding.
- course_records.txt
- README.txt - describes what’s wrong with each line in the invalid file
- invalid_course_records.txt
- starter_course_records.txt
- expected_course_records.txt
- expected_empty_export.txt
- expected_schedule_export.txt
Conceptual Knowledge: Saving Files and Eclipse
There are several ways to save files to your computer. The files may automatically be downloaded to a folder on your computer or you may be able to save your files directly to the test-files folder in your Eclipse project in your local copy of the Git repository.
If you save your files to a downloads or some other folder that is NOT your Eclipse project, you can drag and drop the files into the test-files folder of your project in Eclipse.
If you save your files to the Eclipse project on your computer’s file system, the files will not be immediately available inside of Eclipse. You must refresh your Eclipse project for the files to be available inside of Eclipse. To refresh, right click on your Eclipse project and select Refresh. This will sync your Eclipse workspace information with the actual files in the file system.
You can also interact with your Eclipse file structure from the file system. Your Eclipse project folder structure is in your local git repository. This is usually a path like ~/git/csc216-GP1-001-001/WolfScheduler. You can interact with the files in your Eclipse project directly! However, be careful. There are certain files in this directory structure that are important for working with Eclipse. The .project and .classpath files are used by Eclipse to know that your project is an Eclipse project and the information to help build and work with your project. Please don’t edit these files unless you have merge conflicts. If you do have merge conflicts in these files, we strongly recommend that you work with the teaching staff to resolve the issue!
Reference: Staging and Pushing to GitHub
GitHub Resources:
Check Your Progress
You’ve added test files. Before moving on to the next portion of the Guided Project, complete the following tasks:
- Make sure that all fields, methods, and constructors are commented.
- Resolve all static analysis notifications.
- Add new test files to index. Commit and push your code changes with a meaningful commit message. For example, “[Test] Added test files.”