Guided Task: Eclipse Quick Fix Tool
The Eclipse IDE knows how to identify and fix lots of common errors. By storing patterns of common errors and their solutions, Eclipse can generate a “Quick Fix” for your problems. Quick Fixes are errors and warnings that have a lightbulb on the icon.
Learning Outcomes
- Correct a compiler error using an Eclipse Quick Fix
Best Practice: Quick Fix for Error-Driven Development
One way to use Quick Fix is to first write your code ignoring all of your declarations. If you want to call a class you haven’t written yet, just use it as if it were already created, then apply quick fix to create your class declaration. It takes some getting used to, but this technique enables you to write code very quickly in the end because you don’t have to write so much from scratch. Some developers like to write code in this way because they can simply write what they’re currently thinking about without having to stop and deal with details that can be Quick-fixed. You might find that this way of writing code is not so different from writing pseudo code first!
Reference: Creating Packages and Classes
References:
- Eclipse Package Creation - see Guided Task: Your First Eclipse Project - Create a Package
- Eclipse Class Creation - see Guided Task: Your First Eclipse Project - Create a Class
Create I/O Test Structure
We’re going to start working on implementing Use Case 1: Load Course Catalog where we can process a course catalog file. We typically call working with files I/O or input/output. Since I/O is so different from our Course object, we will create a new package for our I/O implementation.
To demonstrate the use of Quick Fix, test-driven development, and Eclipse code generation, we’ll start by creating our package in the **test** folder. Follow the steps below:
- Create a new package called
edu.ncsu.csc216.wolf_scheduler.ioin thetestfolder of theWolfSchedulerproject. - Create a new Java class called
CourseRecordIOTestin theedu.ncsu.csc216.wolf_scheduler.iopackage of thetestsource directory of theWolfSchedulerproject. - Copy the code from `CourseRecordIOTest.java into your Eclipse file.
Note: Automatic Compile and Rebuilding/Cleaning a Project
If your Problem view fails to display the error, select Project > Build Automatically from the top level menu. It should be checked on. You can also clean your project by selecting Project > Clean. Cleaning your project removes all *.class files and rebuilds your project.*
Compiler Errors in Eclipse
There’s a compiler error in CourseRecordIOTest! You can tell this in several ways:
- There is a red squiggly/dotted line under the
CourseRecordIOtype inCourseRecordIOTest. - There is a little red X along the left-hand side of the editor in the gutter. The icon also contains a light bulb, which lets us know that Eclipse has a Quick Fix.
- The Problems view displays the errors.

The compiler errors state that CourseRecordIO cannot be resolved. We need a CourseRecordIO type for working with reading and writing files that store information about the Courses offered in a given semester! Therefore, you’re going to have to create your own CourseRecordIO class.
Quick Fix
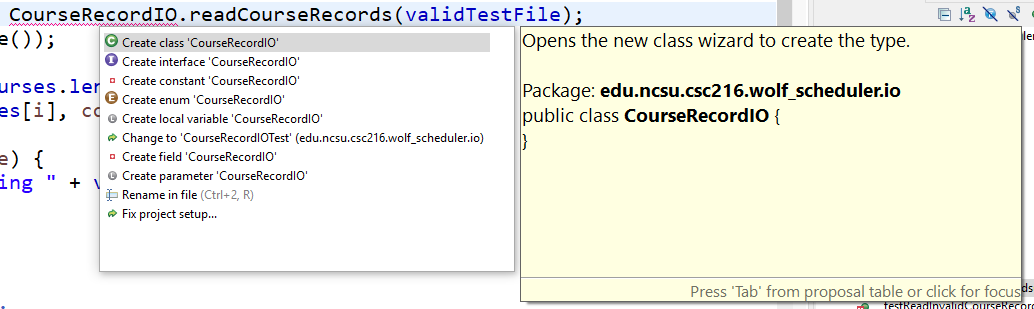
To use Quick Fix, put your cursor anywhere inside the red squiggly of one of the compiler errors. The command for Quick Fix is Ctrl + 1 (that’s the number ONE; Mac users, try Cmd +1). This opens the quick-fix context menu. There are many possible options. Select the first option, to create class CourseRecordIO, by pressing Enter. Note that you can see a preview of what the created class will look like.
Create CourseRecordIO Class
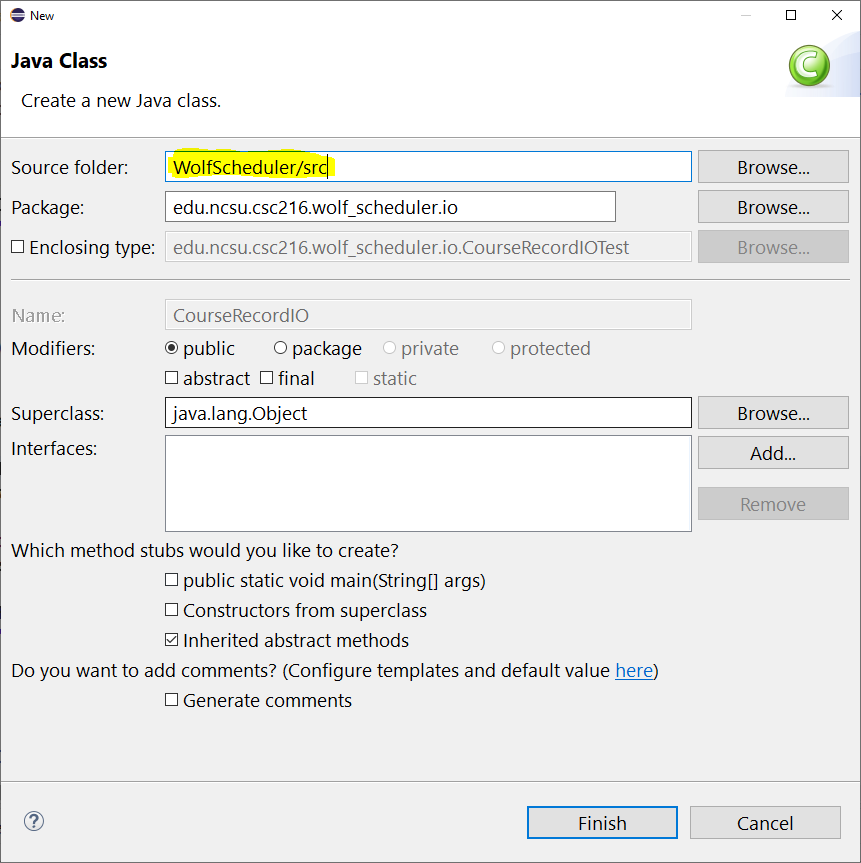
Eclipse opens a wizard for creating a new class. Eclipse will generate what it expects the source folder, package, and class names to be from the context of how the class is used in the source code.
We do need to make one change to the source folder. Change WolfScheduler/test to WolfScheduler/src. The CourseRecordIO class is part of the implementation and therefore belongs in the src folder. The rest of the information should be correct. You can also select the option for Generate comments.
Create CourseRecordIO Methods
You still have compiler errors, even after creating the CourseRecordIO class. That is because CourseRecordIOTest is calling CourseRecordIO methods that don’t yet exist.
Use Quick Fix to generate the readCourseRecords() and writeCourseRecords() methods. The methods that are generated will be static methods. We’ll discuss why in the next section.
CourseRecordIO Method Exceptions
The Eclipse Quick Fix tool can be very powerful, but it is limited to very common and easily-solvable problems. Quick Fix will work only on compiler errors, not logic errors since Quick Fix doesn’t know your requirements. Quick Fix may not always fix your code exactly how you want it, so it’s not a good idea to completely rely on this feature. Common fixes include adding an import, creating a class/method/variable, public/private access, fixing parameters in a method, and so on.
You still have compiler errors, even after generating the CourseRecordIO methods. In this case, Quick Fix will not help us. The suggested fixes are to remove the catch clause or replace catch with throws from the test methods. However, you know that CourseRecordIO will deal with file input and output. That means you need to handle common file I/O exceptions like FileNotFoundException and IOException. We will pass those exceptions on to the client (which right now is the test class) so they can handle as appropriate for reading from or writing to a file in their context. That means the test class should NOT be changed - the expected behavior will be to catch the exceptions that CourseRecordIO will throw.
Conceptual Knowledge: Checked Exceptions
Both FileNotFoundException and IOException are checked exceptions. That means we need to add information to the method headers in CourseRecordIO to state that we will be throwing these exceptions. Javadoc should describe when these exceptions are thrown so the client knows to handle them. Because they are checked exception, the client must handle the exceptions in some way. This can mean that we catch them using try/catch or we could throw to the client’s client using a throws clause on the method header.
You can add throws clauses to the CourseRecordIO method headers, which will show that the methods throw exceptions and will also let our code compile. The finished (and commented) methods should look like the code below. You may copy in the provided comments.
(*Note: You will need to import java.io.FileNotFoundException and java.io.IOException for CourseRecordIO to compile. That’s a great use of Quick Fix!)
package edu.ncsu.csc216.wolf_scheduler.io;

import java.io.FileNotFoundException;
import java.io.IOException;
import java.util.ArrayList;
import java.util.List;

import edu.ncsu.csc216.wolf_scheduler.course.Course;

/**
 * Reads Course records from text files.  Writes a set of CourseRecords to a file.
 *
 * @author Sarah Heckman
 */
public class CourseRecordIO {

    /**
     * Reads course records from a file and generates a list of valid Courses.  Any invalid
     * Courses are ignored.  If the file to read cannot be found or the permissions are incorrect
     * a File NotFoundException is thrown.
     * @param fileName file to read Course records from
     * @return a list of valid Courses
     * @throws FileNotFoundException if the file cannot be found or read
     */
    public static ArrayList<Course> readCourseRecords(String fileName) throws FileNotFoundException {
        // TODO Auto-generated method stub
        return null;
    }

    /**
     * Writes the given list of Courses to
     * @param fileName file to write schedule of Courses to
     * @param courses list of Courses to write
     * @throws IOException if cannot write to file
     */
    public static void writeCourseRecords(String fileName, ArrayList<Course> courses) throws IOException {
        // TODO Auto-generated method stub

    }

}
Renaming Identifiers
You may have noticed that some of the parameter names in the code above are different from the names that Eclipse generated for you. When Eclipse generates methods, it has to guess on the names that you might find useful for a given type. For example, writeCourseRecords()’s first parameter was named string because Eclipse had no context of what that parameter is. That parameter should really be called fileName.
In Java, identifiers are the names that you give classes, methods, and variables. That means they can be used all over your code. Renaming an identifier can take a while to complete, but the compiler will let you know where there are problems. However, renaming an identifier is a very common problem to have and Eclipse has a tool that helps with renaming the selected identifier and all other uses of that identifier in the entire project! Renaming an identifier is a refactoring, which is a small change to the code that improves readability or design but doesn’t change the functionality of the code.
To rename an identifier, first select the identifier and then do one of the following to refactor:
- Right click on the identifier and select Refactor > Rename.
- Press Alt+Shift+R.
An editing box will open. Make your edit and press Enter. The name will change in all locations, including the Javadoc!
Reference: Staging and Pushing to GitHub
GitHub Resources:
Check Your Progress
You’ve added several new files. Before moving on to the next portion of the Guided Project, complete the following tasks:
- Make sure that all fields, methods, and constructors are commented.
- Resolve all static analysis notifications.
- Add new files to the index. Commit and push your code changes with a meaningful commit message.For example, “[Implementation][Test] Added CourseRecordIO and CourseRecordIOTest”.