Guided Task: Java Source Generation
Eclipse provides source generation of commonly written code. You typically use source generation when creating plain old java objects (POJOs) or when overriding methods from the Object class.
Learning Outcomes
- Create fields
- Generate getters and setters for fields
- Generate a constructor for the fields
- Generate overridden
Objectmethodsequals(),hashCode(), andtoString().
Best Practice: IDE Code Generation
Many IDEs have tools that help with common tasks, and some of those tools can help you generate code. You learned how to write these code statements manually in your introductory programming class so that you would fully understand their purpose. Now you can use Eclipse’s code generation tools to help you write common statements. A benefit of using code generation tool, besides saving time, is that the code is more likely to be correct. However, you should always test the generated code to make sure that it meets the requirements of the larger program.
Create State for Course
Source code generation is useful only if you have specified data (or state) for your object. You will create state for Course as defined in UC 1, Processing Course Information. A Course should keep track of its name (e.g., CSC 216), title (e.g., Software Development Fundamentals), section (e.g., 001), credit hours (e.g., 4), instructor’s unity id (e.g., sesmith5), meeting days (e.g., MW), start time (e.g., 1330), and end time (e.g., 1445).
Conceptual Knowledge: Encapsulation - private Fields
An important concept in object-oriented programming is the idea of encapsulation. Encapsulation is the protection of an object’s state. Encapsulated classes are achieved through private fields. If a field is private, that means it can be changed only through the object’s methods (or behaviors). The methods provide a controlled way to change the object’s field and can help ensure that any object invariants (e.g., rules about the object’s state that must be true at all times) are not violated by a client.
That’s why all of the fields listed below are private.
Add the following code to Course to create fields (instance variables). You may copy and paste from the Guided Project.
/** Course's name. */
private String name;
/** Course's title. */
private String title;
/** Course's section. */
private String section;
/** Course's credit hours */
private int credits;
/** Course's instructor */
private String instructorId;
/** Course's meeting days */
private String meetingDays;
/** Course's starting time */
private int startTime;
/** Course's ending time */
private int endTime;
Generate Getters and Setters
Each field that you just created has a yellow warning beside its declaration to indicate that the field is never used locally. The light bulb next to the warning triangle indicates a quick fix. One fix will delete the field. Another will generate the getter (accessor) and setter (mutator) for the field. Typically when creating fields, you will want to generate getters and setters as appropriate to your class.
The Quick Fix tool provides functionality for creating BOTH getters and setters for ONE field. A different feature of Eclipse provides a more general code generation of getter and/or setter methods for all fields in a class and allows for more control over the method visibility.
Conceptual Knowledge: Encapsulation - Getters and Setters
Since methods provide the mechanism of mutating or changing the contents of a field, you should write them carefully in order to control the change that a client can make to the private fields. One example is to make fields that might mutate an object’s data private or not add them to the class.
As you design a class, you should think about when a class should and should not be able to access and change a field and plan accordingly.
For your Course class, you will provide getters and setters for all the fields. The setters will be implemented to ensure that clients of Course are unable to change Course fields to invalid values.
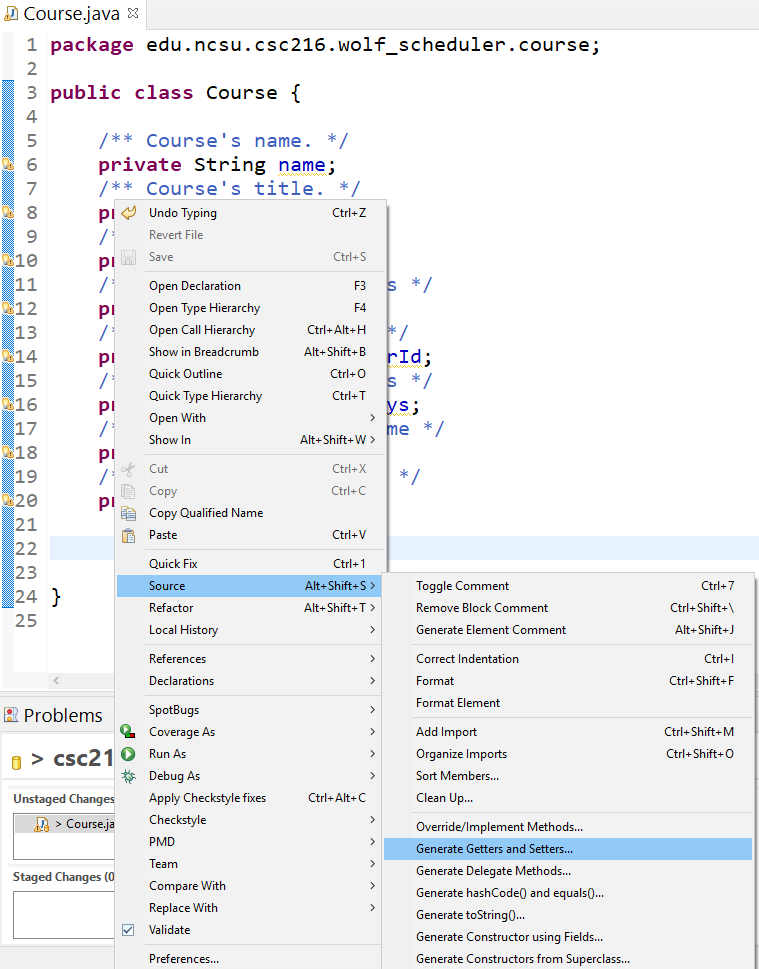
Right click anywhere in the Editor view. Select Source > Generate Getters and Setters.
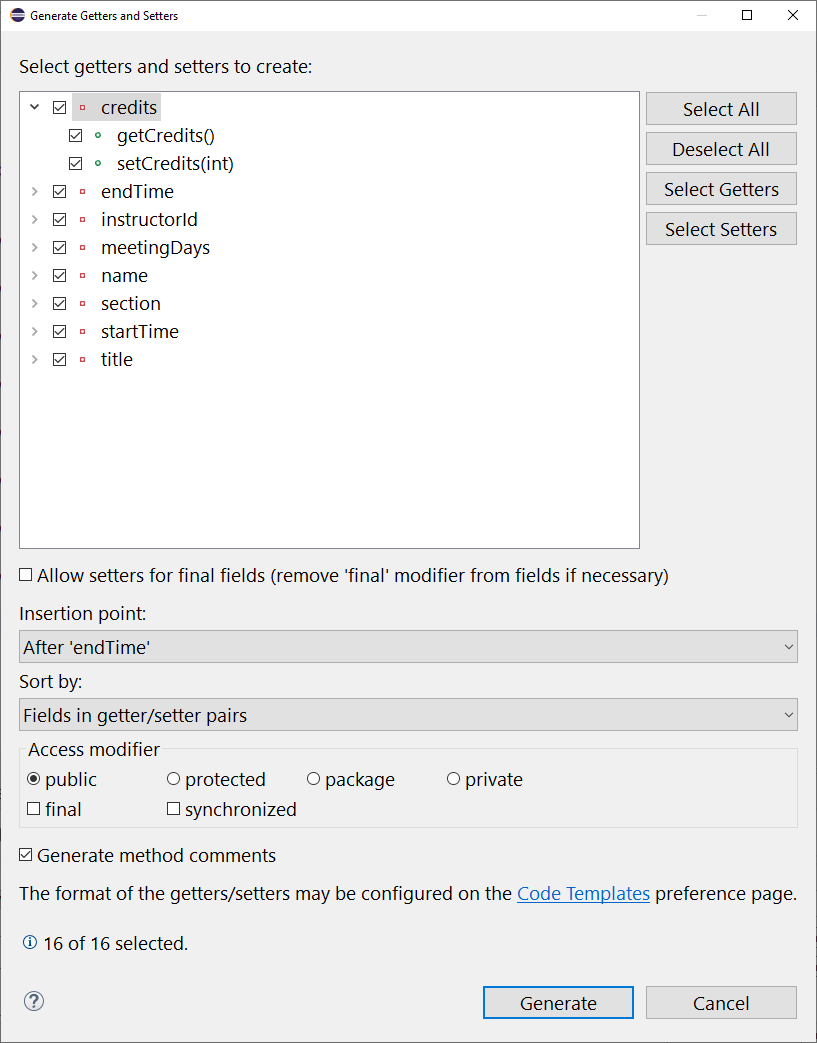
A window opens to display all of the Course fields. Click Select All to generate getters and setters for all of the fields. Use the arrows to see which of the methods will be created for each field. To save a little more coding time, check Generate method comments. Additionally, you can change the insertion point so that the new methods are positioned after the fields. Click Generate when you are done selecting options. The newly generated code will display in the Editor view. Now save Course to remove the earlier warnings associated with each field.
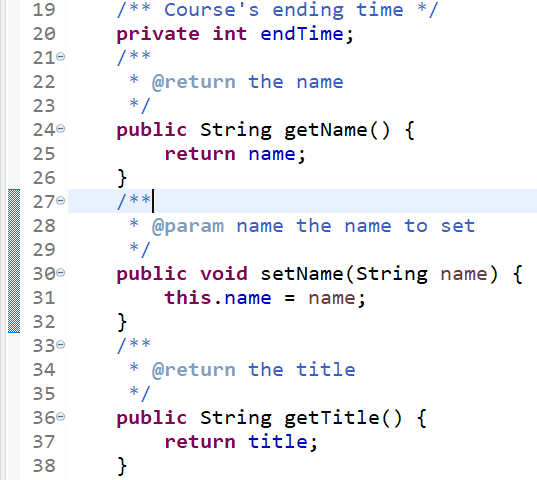
Add method level comments to all of the getters and setters. An example of what the comments might look like for the Course.name field are provided below.
/**
 * Returns the Course's name.
 * @return the name
 */
public String getName() {
    return name;
}

/**
 * Sets the Course's name.
 * @param name the name to set
 */
public void setName(String name) {
    this.name = name;
}
Generate the Course Constructor
Now that you have state for your Course class, you need to create a constructor for setting that state! You could require that clients of Course use the default constructor with no parameters and setters to set up an instance of the Course class. But a client may not set up the Course correctly or miss an important data item. A better solution is to write a constructor in which the calling code passes in values for each Course field (or a subset of fields) and sets the fields by calling the appropriate setter methods.
Constructors provide a concrete mechanism for creating a new instance of a class correctly and ensuring that the values stored in the field are appropriate for the class’s abstraction.
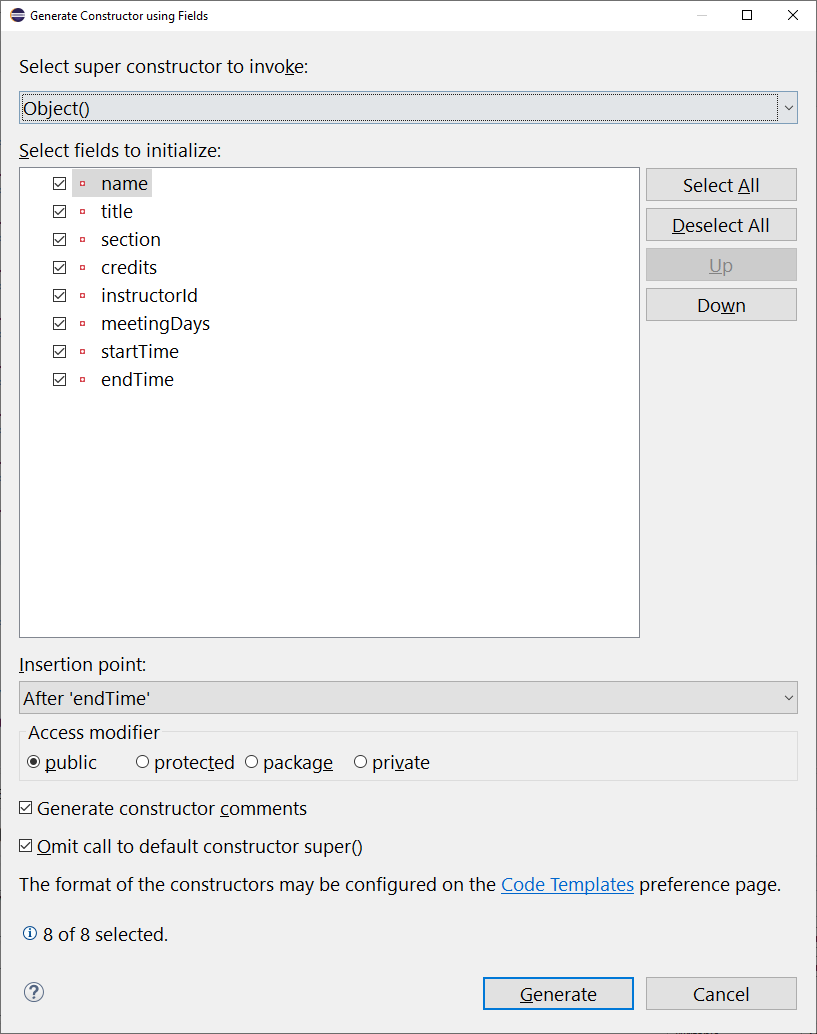
Eclipse can generate a constructor for you. Make sure Course is displayed in the editor, right click the editor and select Source > Generate Constructor using Fields.
Eclipse opens a dialog for selecting which fields to include in the constructor parameters. (Just because you have a field in your class does not require that a value is passed in as a parameter to the constructor, so you can leave fields unchecked. You should handle initialization of those fields within the constructor to an appropriate default value.) Again, check Generate constructor comments. Also, check the option to Omit call to default constructor super(). Optionally change the insertion point so that the constructor is positioned between the field declarations and the getter methods. Click Generate.
After generating the constructor, update the comments!
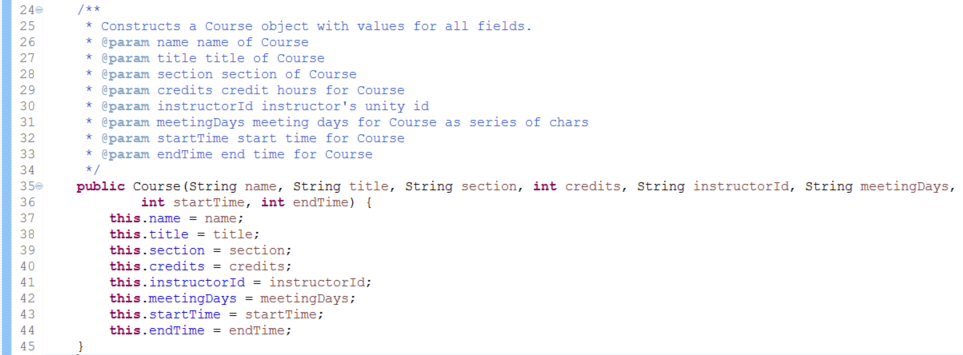
Use the code generation tool to create a Course constructor with only the name, title, section, credits, instructorId, and meetingDays fields. This constructor is used when the course is arranged and there are no start/end meeting times. After generating the constructor, update the comments! When you are done, the constructor should look like the following.
/**
 * Creates a Course with the given name, title, section, credits, instructorId, and meetingDays for
 * courses that are arranged.
 * @param name name of Course
 * @param title title of Course
 * @param section section of Course
 * @param credits credit hours for Course
 * @param instructorId instructor's unity id
 * @param meetingDays meeting days for Course as series of chars
 */
public Course(String name, String title, String section, int credits, String instructorId, String meetingDays) {
    this.name = name;
    this.title = title;
    this.section = section;
    this.credits = credits;
    this.instructorId = instructorId;
    this.meetingDays = meetingDays;
}
Best Practice: Comment Code as You Implement!
Commenting code is important to let others know what your classes, fields, and methods do. It is also important for reminding future you about you implementation.
Do not wait until the last minute to comment your code; comment as you work on things. Even better, you can write your code skeleton and comment the skeleton before you begin writing code. That helpe you think about what a method should do or what a field means before you start trying to implement something!
Generate equals() and hashCode()
The Object class is the parent of all Java classes. It has some frequently used methods: equals(), hashCode(), and toString(). However, Object’s implementation of these methods may not be what you want for your classes. Eclipse can help override these method definitions.
The equals() method compares two objects to determine if they are equivalent. Its default implementation compares the locations of the objects in memory. If the objects are in the same location, then they are the same object, and therefore equivalent. But typically, objects are considered equivalent if some or all of their fields have the same values (for example, if two Book objects have the same title and author, we could consider the Books equal). You can override equals() to define two Courses to be equivalent if their fields match.
If you override equals() using code generation, then you should also override hashCode() to ensure that equivalent objects hash to the same value (you’ll discuss hashes in data structures).
Conceptual Knowledge: The Java Invariant of Overriding equals() and hashCode() Methods
The specifications of the Java programming language state that both the equals() and hashCode() methods should be overridden. Additionally, the same fields considered for equality in the equals() method should be used to generate the object’s hashCode().
A hashCode is a numerical value for an Object that is generated from the Object’s fields. The algorithm to create the hashCode is such that every distinct object should hash to a different value and objects that are the same should hash to the same value. This means that every Object can be identified by its unique hashCode.
The default implementation of hashCode() uses the Object’s memory location to generate the hashCode(). But if we want to provide a different definition of equality to our objects, we should also ensure that those same objects have the same hashCode!
To ensure this, Eclipse requires us to override equals() and hashCode() at the same time using the same fields.
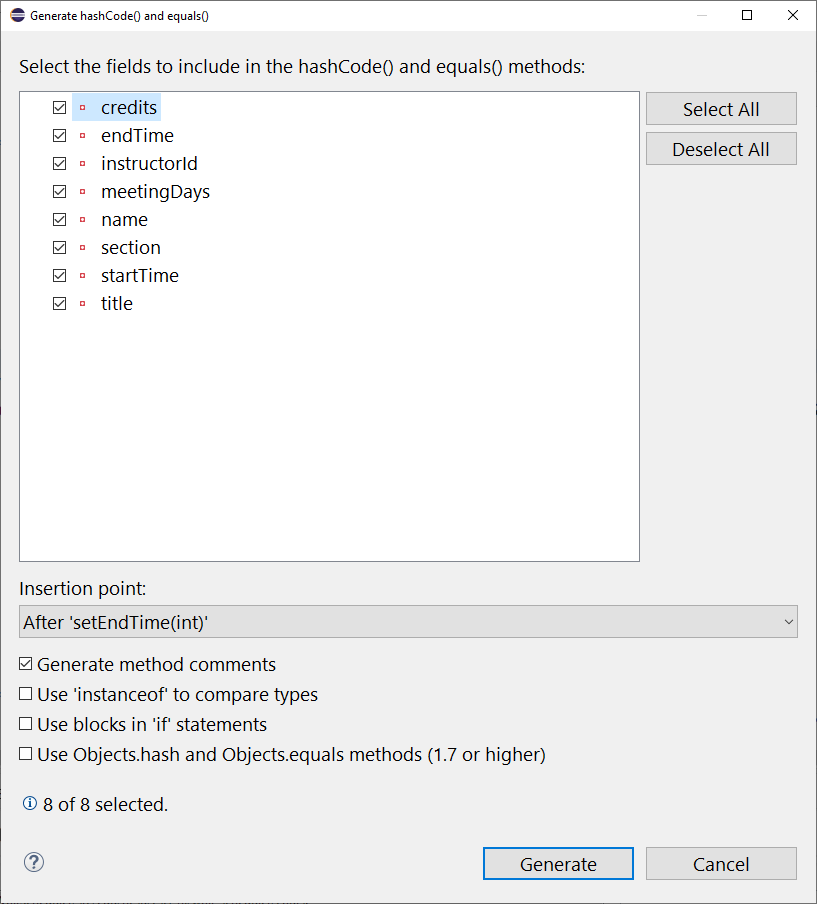
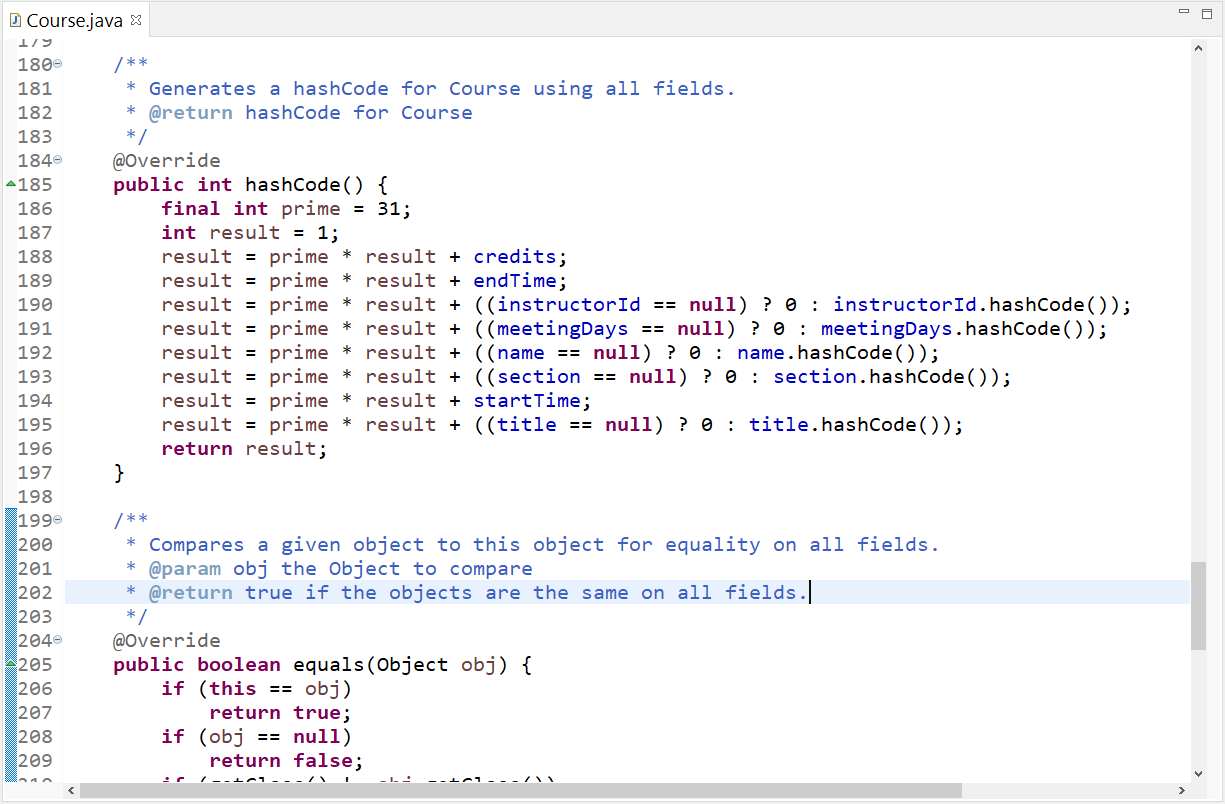
To override equals() and hashCode(), open the Course in the Editor. Right click in the Editor, and select Source > Generate hashCode() and equals(). In the resulting dialog, check which fields are required for object equality. For Course, all fields should be selected. Be sure to check Generate method comments. You can optionally change the insertion point so that the new methods are positioned at the bottom of the getter methods. Click Generate.
See that the methods were generated in your source. Don’t forget to update the comments to be specific to Course and then save your changes!
Best Practice: Comment equals() and hashCode()!
You should always comment overridden methods to provide details about the specific of the override and why the method was overridden. This will help others (and future you) understand the customizations of the overridden method for your class.
Implement toString()
Eclipse code generator also has the option of overriding toString(). Check the fields that are relevant for toString(), generate method comments, then click Generate.
However, you’ll end up using the output of toString() later in the project when writing Course information to a file, which means that you require a specific type of output as per the requirements. Use the following toString() code.
/**
 * Returns a comma separated value String of all Course fields.
 * @return String representation of Course
 */
@Override
public String toString() {
    if (meetingDays.equals("A")) {
        return name + "," + title + "," + section + "," + credits + "," + instructorId + "," + meetingDays;
    }
    return name + "," + title + "," + section + "," + credits + "," + instructorId + "," + meetingDays + "," + startTime + "," + endTime;
}
Reference: Staging and Pushing to GitHub
GitHub Resources:
Check Your Progress
You’ve made a lot of changes to your Course class by adding fields, methods, and constructors. Before moving on to the next portion of the Guided Project, complete the following tasks:
- Comment the
Courseclass. - Make sure that all fields, methods, and constructors are commented.
- Commit and push the
Courseclass to GitHub. Remember to use a meaningful commit message describing how you have changed the code. For example, “[Implementation] Added fields, getters/setters, and Object methods to Course.”.