CSC116: Software Testing
Authors: Dr. Sarah Heckman (sarah_heckman@ncsu.edu), Dr. Jason King (jtking@ncsu.edu), and Dr. Jessica Young Schmidt (jessica_schmidt@ncsu.edu)
Date: 8/2017
Version: 6.0.0
Learning Outcomes
- Describe the purpose of testing.
- Describe the testing process.
- Describe how black box and white box testing differ and why each are necessary.
- Describe the purpose of black box testing.
- Write black box test cases in table form (Black Box Test Plan) based on program requirements.
- Write black box test cases using equivalence classes and boundary value analysis.
- Describe the purpose of white box testing.
- Write white box test cases in the form of a test class.
- Draw a control flow diagram for given code. Calculate the cyclomatic complexity of given code.
- List valid path through given code using control flow diagram.
- Write white box test cases using basis paths, equivalence classes, and boundary value analysis
- Describe the purpose of debugging.
- Apply debugging techniques.
The following are the software testing materials we will use within CSC116:
- Introduction
- Test Cases
- Testing Process
- Testing Strategies
- Example Programming Scenario
- Create Project Directory
- Create Project Directory
- Create Project Directory
- Create Project Directory
- Create Project Directory
- Create Project Directory
- Create Project Directory
- Create Project Directory
- Black Box Testing
- Black Box Testing: Test Requirements
- Black Box Testing: Test Equivalence Classes
- Black Box Testing: Test Boundary Values
- White Box Testing
- White Box Testing: Download JUnit Libraries
- White Box Testing: Write Test Cases
- White Box Testing: Compile and Execute the Test Cases
- White Box Testing: Test Requirements
- White Box Testing: Test Equivalence Classes
- White Box Testing: Test Boundary Values
- White Box Testing: Test All Paths
- White Box Testing: Testing Exceptions
- Summary
- Appendix
Introduction to Software Testing
Writing software is a process where developers take a vision of what an application should do in the form of requirements, design a solution, and then write code that implements the requirements. However, the code that is written may not exactly match the requirements of the system, resulting in lost revenue for a company (or for this class, lost points on an assignment).
Software testing is a process for identifying software faults. A software fault, or logic error, is defined as “an incorrect step, process, or data definition in a program”1. By systematically testing software, we can identify faults in our code and correct those faults as early as possible. The goal of testing is to remove as many faults as possible before releasing the application to our customer. The International Organization for Standardization (ISO) defines software testing as “the dynamic verification of the behavior of a program on a finite set of test cases, suitably selected from the usually infinite execution domains, against the expected behavior”2. The keywords here are:
- Dynamic: meaning we execute the code under test;
- Suitably selected: meaning we systematically and deliberately choose test inputs; and
- Expected behavior: meaning we know what we want the program to do, so that we will know when the program does not meet the requirements.
Software faults typically originate from a programmer mistake, which is “a human action that produces an incorrect result”1. A mistake in the requirements, design, or code, is a fault. Faults remains latent in the software until running the software produces a failure. A software failure is “an event in which a system or system component does not perform a required function within specified limits” 1. Failures are when a program’s behavior deviates from the expected program behavior. Testing identifies failures in a program’s behavior. Investigation of the failure (guided by the failing test case) will lead to one or more underlying fault(s) in the software that must be fixed. This investigation and fixing of faults is called debugging.
Testing consists of many executions of a program and each execution has a different input with a different expected result. A distinct execution with a given input and expected output is a test case.
Test Cases
A test case contains (explicitly or implicitly) the following information:
- A unique identifier;
- A set of test inputs;
- The expected results from executing the test inputs; and
- The actual results of running the test case.
Unique Identifier: A unique identifier names a test case and the name should be descriptive of what the test verifies or what requirement(s) the test validates.
Test Inputs: A test case should have a set of one or more inputs. The inputs drive the test case and may be parameters to a method, user inputs to a user interface (UI), or files that an application uses. The key is that these inputs should be specific and repeatable. Both characteristics are required so that anyone can execute a test case and receive the expected results (assuming that the program has no faults). If specific inputs are not recorded, then more time may be spent trying to rediscover broken functionality, rather than fixing functionality.
Expected Results: The expected results describe the output from a correct execution of the program on a set of given inputs. By knowing what is correct, we can quickly identify when a program is not working. The expected results may be returned from a method or associated methods of a class, be a message or output to a UI, or information written to a file. All expected results should be specific values for clarity in determining if a test passes or fails. The expected results are determined by examining the requirements of the program.
Actual Results: The actual results record what happens when the test case is run. Any difference in expected and actual results represents a failing test case.
Testing Process
Program requirements document what the customer wants a program to do. The requirements define the expected results of a test case. If a test case fails, meaning the actual results of the program do not match the expected results, then we have not met our requirements. A test failure implies a debugging session to find the underlying fault is necessary. Figure 1 shows the flow for generating and running test cases on a program.
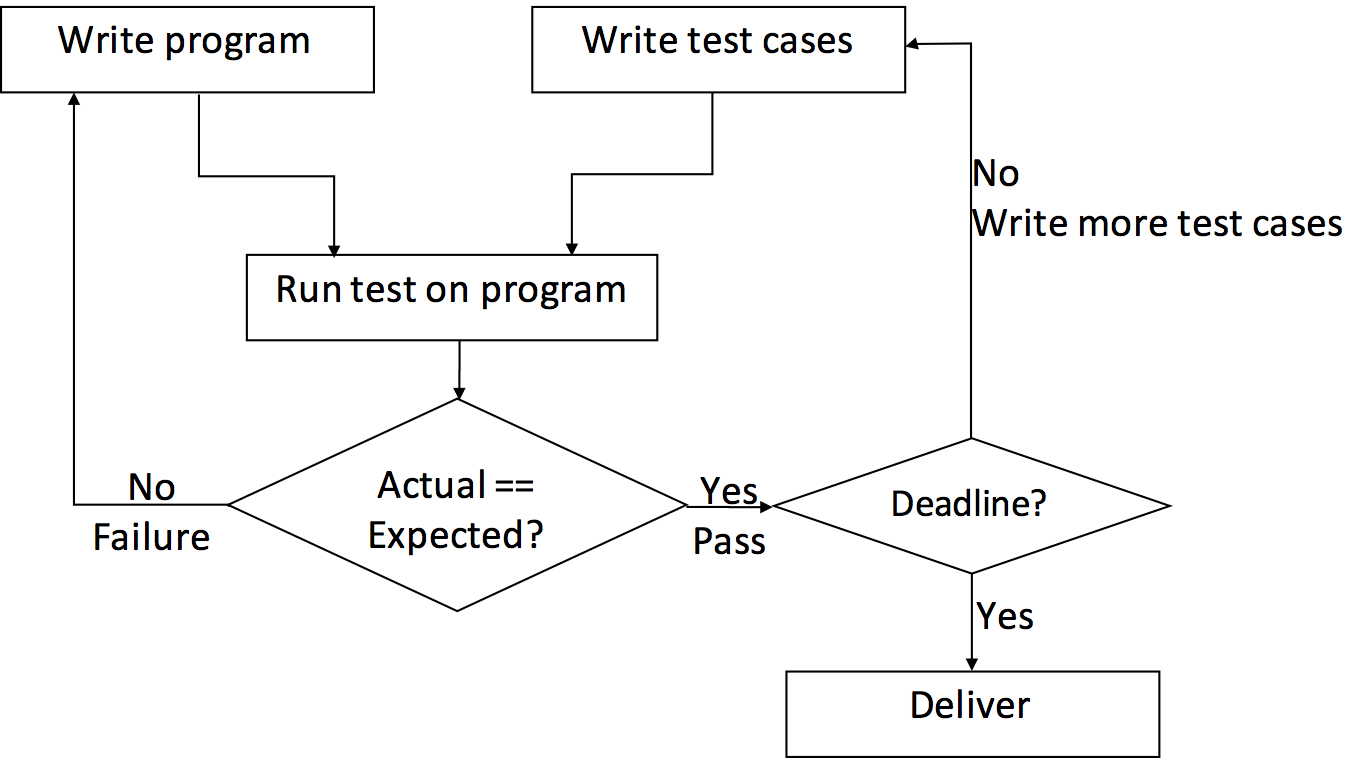
Developers start by writing their program and test cases. These tasks may be done simultaneously or asynchronously depending on personal preference; however, both the source code and the test cases are required before any tests can be run on a program.
A test case is run by executing the program with the test inputs specified by a test case. If the actual output does not match the expected output, the test fails. The failure helps guide developers to the underlying fault to fix the mistake.
Passing tests increase confidence that a program meets the program requirements. If there is more time before a deadline, additional tests will increase confidence further. While software testing is useful for finding underlying faults, no amount of testing can unequivocally demonstrate the absence of faults in your code. Additional testing will provide some confidence that your program will perform as expected most of the time, at least for the cases you tested.
Ultimately, your product must be delivered. Plan your time to allow for sufficient testing of the requirements to ensure delivery of a high quality product.
Testing Strategies
There are two basic testing techniques: Black Box Testing and White Box Testing. The following sections contain basic testing techniques, including strategies for maximizing the effectiveness of testing. For you, the student, the cost of a failure (and the underlying fault) is a few points off of your programming assignment. For large corporations, the cost of releasing a failure to users can be in the millions, if not billions, of dollars. A mistake can also lead to the loss of customers’ confidence in the company.
Example Programming Scenario
In the following sections, we will use the following example to illustrate black box and white box testing of the Paycheck program:
Raleigh’s Parks and Recreation Department hires landscapers to care for and maintain the city’s parks.
An employee has one of three skill levels; each with a hourly pay rate:
Skill Level - Hourly Pay Rate ($)
Level 1 - $19.00
Level 2 - $22.50
Level 3 - $25.75
All employees may opt in for insurance, which results in a deduction from their pay check.
Deduction - Weekly Cost ($)
Option 1 - Medical Insurance - $24.50
Option 2 - Dental Insurance - $15.30
Option 3 - Vision Insurance - $5.25
Employees at skill level 3 may also opt to place up to 6% of their gross pay into a retirement account.
The following information is printed about the employee’s pay check: 1) employee’s name 2) hours worked for a week 3) hourly pay rate 4) regular pay for up to 40 hours worked 5) overtime pay (1.5 pay rate) for hours over 40 worked 6) gross pay (regular + overtime) 7) total deductions 8) net pay (gross pay – total deductions). If the net pay is negative, meaning the deductions exceeds the gross pay, then an error is printed.
The Paycheck program prompts the user for information about the Employee, including the name, level (1, 2, or 3), hours worked, retirement percent, and whether he or she has medical, dental, and vision insurances. This program assumes a perfect user. There is no error checking for user input based on data type.
The following commands compile and run the Paycheck program:
$ javac Paycheck.java
$ java Paycheck
Create Project Directory
To help keep our project3 code and other files organized, first create a project directory, which will eventually contain all of your source and test code for your project along with other documents. If your section required GitHub repos for submissions, your project directory would go within the repo directory.
Reminder
If your section required GitHub repos for submissions, your project directory would go within the repo directory. You will clone the repo and move into the repo directory prior to creating project directory. For example, pwd would result in /afs/unity.ncsu.edu/users/j/jtking/csc116/csc116-001-LabX-01/Paycheck where your cloned repo is csc116-001-LabX-01.
For example:
% pwd
/afs/unity.ncsu.edu/users/j/jtking/csc116

% mkdir Paycheck

% ls
Paycheck

% cd Paycheck
% pwd
/afs/unity.ncsu.edu/users/j/jtking/csc116/Paycheck
Project Structure
Within the project directory, we will create the following directories, which will help organize and separate your files into:
src(source) code,test(test) code,lib(library) files,bin(compiled.class) files,doc(generated Javadoc) files, andproject_docs(project document) files (e.g., Black Box Test Plan)
Paycheck
    -> src  (directory will contain your source code)
    -> test (directory will contain your test code)
    -> lib  (directory will contain your JUnit library file)
    -> bin  (directory that will contain all of your .class files)
    -> doc  (directory that will contain all of your Javadoc files)
    -> project_docs (directory that will contain all of your project documents, e.g., Black Box Test Plan)
Place Paycheck.java in src
We will place Paycheck.java into src directory.
Our directory structure4 will be:
Paycheck
    -> src
        -> Paycheck.java
    -> test
    -> lib
    -> bin
    -> doc
    -> project_docs
Compile Code
Assuming you are currently in your top-level project directory (Paycheck), then compile your source code using the following command:
javac -d bin src/Paycheck.java
The -d argument tells Java the destination directory that it should save the compiled .class files into. Here, we tell Java to save the .class files into the bin directory.
Execute Code
Now that we have compiled the source code, your directory structure should currently look like:
Paycheck
    -> src
        -> Paycheck.java
    -> test
    -> lib
    -> bin
        -> Paycheck.class
    -> doc
    -> project_docs
When we execute Java programs, we are actually executing the .class files.
To execute the Paycheck program, make sure you are in your top-level project directory (Paycheck) and use the following command:
java -cp bin Paycheck
The -cp argument tells Java the classpath where the compiled .class files are located. Here, we tell Java that the .class files are in the bin directory.
Black Box Testing
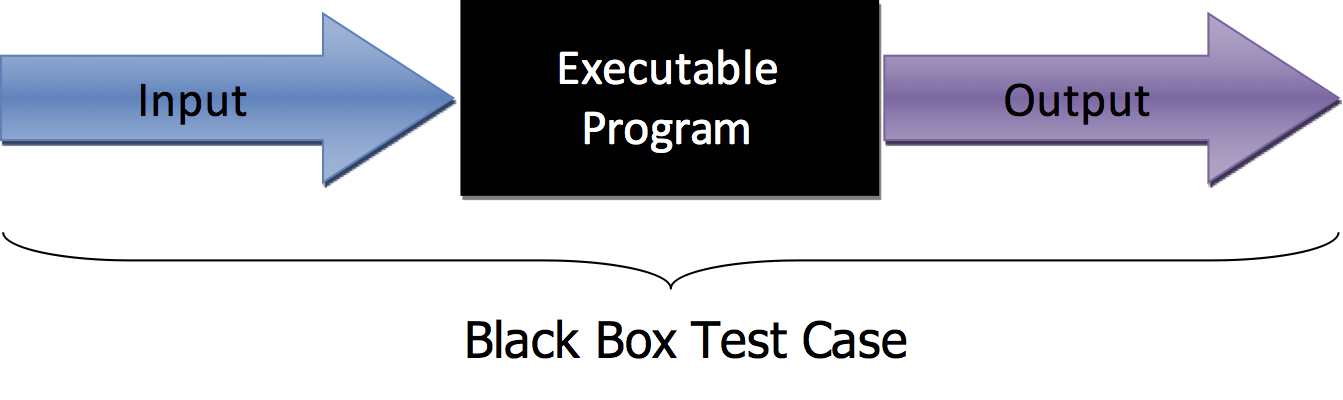
Black box testing, which is also called functional or system testing, ignores the internals of the program and instead focuses on the inputs and the expected results of the program as defined by the requirements. The tester treats the program as a “black box”; the program implementation that generates the program output is unknown. The tester identifies the expected program output from the requirements and can compare the actual output with the expected output. Figure 2 presents a pictorial representation of black box test cases.
Black box testing can be used to find the following types of failures5:
- Incorrect or missing functions,
- Interface errors,
- Errors in data structures or external data base access,
- Behavior or performance errors, and
- Initialization and termination errors.
Typically, black box tests are run by an unbiased third-party, not the programmer who developed the code. However, in the absence of the third-party tester, a developer can test their own code by ignoring the internals. One good strategy for effective black box testing is to write the test cases before starting to write the code. Black box tests test what the customer wants the program to do and are obtained from the program requirements.
Like all test cases, black box test cases have an identifier, a set of specific and repeatable inputs, a set of expected results, and the actual results from executing the test case. The test information can be organized into a Black Box Test Plan document using the table. The Black Box Test Plan should include an overview of the program, tests, and information about how to start testing the program. If the tests require any files, information about where those files are and the file contents should be included.
| Test ID | Description | Expected Results | Actual Results |
|---|---|---|---|
The test ID column of the test plan table contains a unique identifier for the test case. The unique identifier provides a common language for talking about test cases with developers and testers. The test ID could be a number, but a descriptive phrase about the test case is best. The test ID column can also contain additional information like the test author’s name, the requirement under test, the type of test, etc.
The description column contains the steps and inputs the tester enters into the program. The description may also include preconditions for running the test. For example, the program must be started. The information that is recorded in the description should be specific and repeatable, which means that actual values are given. Instead of saying, “enter a dollar amount between 10 and 20” the description should say “enter 15.” For black box testing, the description provides all inputs a user must enter into a program.
The expected results column reports what the program should do as defined by the requirements. This means that the expected results are determined prior to running the program. Like the description column, the expected results should be specific. For black box tests cases, the expected results report what the program presents to the user through the user interface.
The actual results column is filled in when the test is executed. Ideally, the actual results should match the expected results. When they do not match, the test fails, and work to debug the program commences. Failing and passing test cases should be rerun after debugging. Passing tests should be rerun to ensure that any changes to the program under test did not cause a new fault.
We are covering three black box testing strategies: testing requirements, testing representative values of equivalence classes, and testing boundary values. Some of the test cases generated by one strategy may also be generated by another strategy.
Black Box Testing: Test Requirements
When testing a program, you should ensure that all of the customer requirements are tested at least once. Our Paycheck program has the requirement that if the net pay is negative, meaning the deductions exceeds the gross pay, then an error is printed. The following test case would test that requirement. The bold text in the description shows the values the tester would enter into the Paycheck program at the given prompts.
| Test ID | Description | Expected Results | Actual Results |
|---|---|---|---|
| Boundary regular hours, All insurances, Level 1 |
Preconditions: Paycheck program started Employee Name: Alice Anderson Employee Level: 1 Hours Worked: 0 Medical Insurance (Y/N): Y Dental Insurance (Y/N): Y Vision Insurance (Y/N): Y |
Error Message |
Black Box Testing: Test Equivalence Classes
There is only a limited amount of time to test and an infinite number of possible test cases. We want to focus on test cases that will uncover new errors, not test cases that are essentially equivalent to other test cases. We can divide the input or output space into ranges or categories of data. We generate test cases by picking one representative value from each of the possible input ranges/categories or by picking input values that would get to a representative output value. If all of the values in an equivalence class are handled in a similar way, testing one representative value in each equivalence class increases confidence that the program would work with other inputs from the equivalence class. At a minimum, there are two equivalence classes for input: (1) valid or allowed input and (2) invalid or not allowed input.
The following guidelines are helpful for defining equivalence classes5:
- If the input condition is a range, you’ll create one valid and two invalid (above and below the valid range) equivalence classes.
- If input conditions are specific values, then the values are each a valid (for that value) equivalence class and all other values are in an invalid equivalence class.
- If input conditions are members of a set, then the members of the set are in the valid equivalence class and all other possibilities are in the invalid equivalence class.
- If an input condition is a boolean, there is one valid and one invalid equivalence class.
Representative values for an equivalence class are the specific valid/invalid values or a middle value in a range. If valid or invalid input is a range of numbers, choose a value that is in the middle of the range, rather than a value at range boundary. The boundary values are considered next.
There are three main groups of input and output in the Paycheck program: skill levels, insurances, and hours worked. For employees of skill level 3, there is also the equivalence class for retirement. For skill levels, there equivalence classes for skill level 1, skill level 2, skill level 3, and invalid skill level. For each type of insurance, there are two equivalence classes: having insurance and not having insurance. For hours worked, there are three equivalence class: regular hours, overtime hours, and invalid hours (negative).
Skill Level
Our test of the requirements may also satisfy equivalence classes. The test shown on previous page satisfies the equivalence class for a skill level 1. We can add other tests for skill levels as shown below. Note that to make a complete test execution, we are also providing input for all user input.
| Test ID | Description | Expected Results | Actual Results | |
|---|---|---|---|---|
| Mid-range regular hours, Two insurances, Level 1 |
Preconditions: Paycheck program started Employee Name: Carol Cole Employee Level: 1 Hours Worked: 10 Medical Insurance (Y/N): Y Dental Insurance (Y/N): N Vision Insurance (Y/N): Y |
Name Hours PayRate Regular OT Gross Deduc. Net Carol Cole 10.00 19.00 190.00 0.00 190.00 29.75 160.25 |
||
| Mid-range regular hours, Two insurances, Level 2 |
Preconditions: Paycheck program started Employee Name: Carol Cole Employee Level: 2 Hours Worked: 10 Medical Insurance (Y/N): Y Dental Insurance (Y/N): N Vision Insurance (Y/N): Y |
Name Hours PayRate Regular OT Gross Deduc. Net Carol Cole 10.00 22.50 225.00 0.00 225.00 29.75 195.25 |
||
| Mid-range regular hours, Two insurances, Level 3, Boundary retirement |
Preconditions: Paycheck program started Employee Name: Carol Cole Employee Level: 3 Hours Worked: 10 Medical Insurance (Y/N): Y Dental Insurance (Y/N): N Vision Insurance (Y/N): Y Retirement Percentage (0-6): 1 |
Name Hours PayRate Regular OT Gross Deduc. Net Carol Cole 10.00 25.75 257.50 0.00 257.50 32.32 225.18 |
Insurance
In the above test cases, we consider yes and no for each of the insurance types. The following two tests also test yes and no for each insurance.
| Test ID | Description | Expected Results | Actual Results |
|---|---|---|---|
| Mid-range regular hours, Two insurances, Level 1 |
Preconditions: Paycheck program started Employee Name: Danny D David Employee Level: 1 Hours Worked: 20 Medical Insurance (Y/N): Y Dental Insurance (Y/N): Y Vision Insurance (Y/N): N |
Name Hours PayRate Regular OT Gross Deduc. Net Danny D David 20.00 19.00 380.00 0.00 380.00 39.80 340.20 |
|
| Boundary regular hours, One insurance, Level 1 |
Preconditions: Paycheck program started Employee Name: Ellen Edwards Employee Level: 1 Hours Worked: 39 Medical Insurance (Y/N): N Dental Insurance (Y/N): N Vision Insurance (Y/N): Y |
Name Hours PayRate Regular OT Gross Deduc. Net Ellen Edwards 39.00 19.00 741.00 0.00 741.00 5.25 735.75 |
Hours Worked
Considering the possible equivalence classes for hours worked other tests of the requirements. For the Paycheck program, we would want at least one middle test that would result in each class. Tests for these equivalence classes are shown below.
| Test ID | Description | Expected Results | Actual Results |
|---|---|---|---|
| Mid-range regular hours, Two insurances, Level 1 |
Preconditions: Paycheck program started Employee Name: Danny D David Employee Level: 1 Hours Worked: 20 Medical Insurance (Y/N): Y Dental Insurance (Y/N): Y Vision Insurance (Y/N): N |
Name Hours PayRate Regular OT Gross Deduc. Net Danny D David 20.00 19.00 380.00 0.00 380.00 39.80 340.20 |
|
| Mid-range overtime hours, No insurance, Level 1 |
Preconditions: Paycheck program started Employee Name: Hilda Henderson Employee Level: 1 Hours Worked: 50 Medical Insurance (Y/N): N Dental Insurance (Y/N): N Vision Insurance (Y/N): N |
Name Hours PayRate Regular OT Gross Deduc. Net Hilda Henderson 50.00 19.00 760.00 285.00 1045.00 0.00 1045.00 |
Black Box Testing: Test Boundary Values
Programmers tend to make mistakes at the boundaries of equivalence classes. Think of the mistakes you may have made when specifying the start and end points of a for loop. Boundary value analysis guides the creation of test cases at the boundaries or edges of a problem. When testing a boundary, you want to test the boundary itself. You also want to test the values immediately on either side of the boundary.
The input for hours worked for the Paycheck program has two boundaries as illustrated in Figure 3. We want to test the boundary of 0 and the values to either side. We also want to test the boundary of 40. Some tests for the boundary are shown below.

| Test ID | Description | Expected Results | Actual Results |
|---|---|---|---|
| Boundary regular hours, Two insurances, Level 3, Boundary retirement |
Preconditions: Paycheck program started Employee Name: Bob Baker Employee Level: 3 Hours Worked: 1 Medical Insurance (Y/N): N Dental Insurance (Y/N): Y Vision Insurance (Y/N): Y Retirement Percentage (0-6): 1 |
Name Hours PayRate Regular OT Gross Deduc. Net Bob Baker 1.00 25.75 25.75 0.00 25.75 20.80 4.95 |
|
| Boundary regular hours, One insurance, Level 3, Boundary retirement |
Preconditions: Paycheck program started Employee Name: Ellen Edwards Employee Level: 3 Hours Worked: 39 Medical Insurance (Y/N): N Dental Insurance (Y/N): N Vision Insurance (Y/N): Y Retirement Percentage (0-6): 5 |
Name Hours PayRate Regular OT Gross Deduc. Net Ellen Edwards 39.00 25.75 1004.25 0.00 1004.25 55.46 948.79 |
|
| Boundary regular hours, One insurance, Level 3, Boundary retirement |
Preconditions: Paycheck program started Employee Name: Frank Frankenstein Employee Level: 3 Hours Worked: 40 Medical Insurance (Y/N): Y Dental Insurance (Y/N): N Vision Insurance (Y/N): N Retirement Percentage (0-6): 6 |
Name Hours PayRate Regular OT Gross Deduc. Net Frank Frankenstein 40.00 25.75 1030.00 0.00 1030.00 86.30 943.70 |
|
| Boundary overtime hours, One insurance, Level 3, Mid-range retirement |
Preconditions: Paycheck program started Employee Name: George George Employee Level: 3 Hours Worked: 41 Medical Insurance (Y/N): N Dental Insurance (Y/N): Y Vision Insurance (Y/N): N Retirement Percentage (0-6): 2 |
Name Hours PayRate Regular OT Gross Deduc. Net George George 41.00 25.75 1030.00 38.62 1068.62 36.67 1031.95 |
White Box Testing
With white-box testing, the code under test is known, and we can use what we know about the code and the paths through the code to guide our tests. Additionally, our test cases and knowledge about the code can help guide us to the code locations likely to contain errors. White box testing techniques allow the tester to5: 1) exercise independent paths within the source code; 2) exercise logical decisions as both true and false; and 3) exercise loops at their boundaries. Later classes in the CSC curriculum at NCSU will provide instruction on using white-box testing to test internal data structures.
Typically, when performing white box testing, you want to focus on testing individual methods. This type of testing is called unit testing. Unit testing means that we are testing a specific unit of code, in our case, individual methods. When we start testing methods together, for example when one method calls another method, we are running integration tests. Integration testing means that we are testing how units of code work together. A combination of unit and integration testing can increase the confidence that small portions of our code work together. If the small portions work together, then it is more likely the full system will work correctly.
The test strategies discussed for black box testing (e.g., test requirements, test equivalence classes, and test boundaries) still apply for white box testing. The focus of the test is shifted from the entire program to a method or small unit of our code. With white box testing, we can consider another testing strategy: basis set testing. Since we know the code under test, we can write test cases to exercise all paths in the code. We will write white box tests using each of these strategies.
First, we will discuss how to structure our white box tests so that we
may automate their execution. JUnit is a software testing framework for the Java programming language that reduces the complexity of implementing white-box test cases for your code.
Download JUnit Libraries
JUnit is not provided in the default Java libraries (String, Scanner, etc. are provided with Java). Instead, we have to download the JUnit libraries.
- Download
junit-4.12.jarfile into yourlibdirectory in your project. - Download
hamcrest-core-1.3.jarfile into yourlibdirectory in your project.
Both junit-4.12.jar and hamcrest-core-1.3.jar are required to run test cases from the command line.
The directory structure should now be:
Paycheck
    -> src
        -> Paycheck.java
    -> test
    -> lib
        -> junit-4.12.jar
        -> hamcrest-core-1.3.jar
    -> bin
        -> Paycheck.class
    -> doc
    -> project_docs
        -> Black Box Test Plan
Writing White Box Test Cases
For white box test cases, we can automate our test cases by creating a
test class. By convention, JUnit test classes should be named <nameOfSourceClass>Test.java. Therefore, the test class for a
program called Paycheck would be PaycheckTest. All test classes will go in the test directory.
If our program under test contains methods, we can call methods in the program under test similarly to how we call methods of the Math class:
<ProgramUnderTest>.<methodName>(<parameters>);
When creating a test program, the test cases can be broken out into
methods. You can have one or more test method for each method under
test. A good naming convention is to call your test method
test<MethodName><DescriptionOfTest>.
Inside of each test method, we need to use one or more JUnit assert statements.
JUnit Annotations
The test class includes different types of methods that have the following annotations:
@Beforeis used to identify a method that executes before each of your individual test methods. This is useful for constructing new objects and ensures that each test executes with the same initial starting conditions.@Testis used to identify each test method in your test class.
PaycheckTest Example
import org.junit.*;
import junit.framework.TestCase;

/**
 * Test class for the Paycheck program.
 *
 * @author Sarah Heckman
 * @author Jessica Young Schmidt
 */
public class PaycheckTest extends TestCase {

    /**
     * Test the Paycheck.getPayRate() method.
     */
    @Test
    public void testGetPayRate() {

    }

    /**
     * Test the Paycheck.calculateRegularPay() method.
     */
    @Test
    public void testCalculateRegularPay() {

    }

    /**
     * Test the Paycheck.calculateOvertimePay() method.
     */
    @Test
    public void testCalculateOvertimePay() {

    }

    /**
     * Test the Paycheck.calculateGrossPay() method.
     */
    @Test
    public void testCalculateGrossPay() {

    }

    /**
     * Test the Paycheck.calculateTotalDeductions() method.
     */
    @Test
    public void testCalculateRetirement() {

    }

    /**
     * Test the Paycheck.calculateNetPay() method.
     */
    @Test
    public void testCalculateNetPay() {

    }

}
Figure 4: Skeleton of the Paycheck program.
The extends keyword suggests an ‘is-a’ relationship. For example, PaycheckTest is-a TestCase. You will learn more about extends and the ‘is-a’ relationship in CSC216.
The directory structure should now be:
Paycheck
    -> src
        -> Paycheck.java
    -> test
        -> PaycheckTest.java
    -> lib
        -> junit-4.12.jar
        -> hamcrest-core-1.3.jar
    -> bin
        -> Paycheck.class
    -> doc
    -> project_docs
        -> Black Box Test Plan
Assert Statements
The JUnit library includes many different types of assert statements. The common ones you may use are outlined in the table below.6
| Statement | Description |
|---|---|
assertTrue(value) |
asserts that the value passed as a parameter is boolean true. If it is not true, the test case will fail. |
assertTrue(message, value) |
asserts that the value passed as a parameter is boolean true. If it is not true, the test case will fail with the given message. |
assertFalse(value) |
asserts that the value passed as a parameter is boolean false. If it is not false, the test case will fail. |
assertFalse(message, value) |
asserts that the value passed as a parameter is boolean false. If it is not false, the test case will fail with the given message. |
assertEquals(expectedValue, actualValue) |
asserts that expectedValue equals the actualValue. If the two values are not equal, the test case will fail. |
assertEquals(message, expectedValue, actualValue) |
asserts that expectedValue equals the actualValue. If the two values are not equal, the test case will fail with the given. |
assertEquals(expectedValue, actualValue, delta) |
asserts that expectedValue and actualValue are equal to within a positive delta. Otherwise, the test case will fail. |
assertEquals(message, expectedValue, actualValue, delta) |
asserts that expectedValue and actualValue are equal to within a positive delta. Otherwise, the test case will fail. |
Compile and Execute the Test Cases
Compile the Project Code
To compile our project, we have to do a series of steps. We have to compile the source code, the test code, and also tell Java where to find the JUnit library files that we downloaded into our lib directory.
First, change directory into the top-level of your project (the Paycheck directory).
Compile Source Code
Assuming you are currently in your top-level project directory (Paycheck), then compile your source code using the following command:
javac -d bin src/Paycheck.java
The -d argument tells Java the destination directory that it should save the compiled .class files into. Here, we tell Java to save the .class files into the bin directory.
Compile Test Code
Assuming you are currently in your top-level project directory (Paycheck), then compile your test code using the following command:
javac -d bin -cp bin:lib/* test/PaycheckTest.java
- The
-cpargument tells Java that the next token is the directory that follows contains our compiled.classfiles and library files. binindicates that thebindirectory contains our compiled.classfiles. We save our.classfiles into thebindirectory to keep them separated from our.javafiles.- In addition, we specify the path to our libary files (in the
lib/directory). Here, we can use the wildcard symbol (*) so that we do not have to type out the full names of each of the.jarfiles. - WINDOWS: Notice that the different classpaths are separated by a
;(semicolon) instead of a colon and enclose the combination in quotes. For example:javac -d bin -cp "bin;lib/*" test/PaycheckTest.java - LINUX/MAC: Notice that the different classpaths are separated by a
:(colon) instead of a semicolon.
Execute the Test Cases
Now that we have compiled all the source and test code, we can execute our test cases.
Your directory structure should be:
Paycheck
    -> src
        -> Paycheck.java
    -> test
        -> PaycheckTest.java
    -> lib
        -> junit-4.12.jar
        -> hamcrest-core-1.3.jar
    -> bin
        -> Paycheck.class
        -> PaycheckTest.class
    -> doc
    -> project_docs
        -> Black Box Test Plan
When we execute Java programs, we are actually executing the .class files.
To execute the PaycheckTest test cases, make sure you are in your top-level project directory (Paycheck) and use the following command:
java -cp bin:lib/* org.junit.runner.JUnitCore PaycheckTest
We can use a wildcard * symbol to tell Java to include all .jar library files contained in the lib/ directory. This helps us save time since we no longer have to type-out the entire path and .jar file names each time!
Interpreting the Results
You should receive terminal output similar to the following:
JUnit version 4.12
..E....
Time: 0.01
There was 1 failure:
1) testGetPayRate(PaycheckTest)
junit.framework.AssertionFailedError: Paycheck.getPayRate(Paycheck.LEVEL_1) expected:<1900> but was:<2250>
	at junit.framework.Assert.fail(Assert.java:57)
	at junit.framework.Assert.failNotEquals(Assert.java:329)
	at junit.framework.Assert.assertEquals(Assert.java:78)
	at junit.framework.Assert.assertEquals(Assert.java:234)
	at junit.framework.TestCase.assertEquals(TestCase.java:401)
	at PaycheckTest.testGetPayRate(PaycheckTest.java:18)
	at sun.reflect.NativeMethodAccessorImpl.invoke0(Native Method)
	at sun.reflect.NativeMethodAccessorImpl.invoke(NativeMethodAccessorImpl.java:62)
	at sun.reflect.DelegatingMethodAccessorImpl.invoke(DelegatingMethodAccessorImpl.java:43)
	at java.lang.reflect.Method.invoke(Method.java:498)
	at junit.framework.TestCase.runTest(TestCase.java:176)
	at junit.framework.TestCase.runBare(TestCase.java:141)
	at junit.framework.TestResult$1.protect(TestResult.java:122)
	at junit.framework.TestResult.runProtected(TestResult.java:142)
	at junit.framework.TestResult.run(TestResult.java:125)
	at junit.framework.TestCase.run(TestCase.java:129)
	at junit.framework.TestSuite.runTest(TestSuite.java:252)
	at junit.framework.TestSuite.run(TestSuite.java:247)
	at org.junit.internal.runners.JUnit38ClassRunner.run(JUnit38ClassRunner.java:86)
	at org.junit.runners.Suite.runChild(Suite.java:128)
	at org.junit.runners.Suite.runChild(Suite.java:27)
	at org.junit.runners.ParentRunner$3.run(ParentRunner.java:290)
	at org.junit.runners.ParentRunner$1.schedule(ParentRunner.java:71)
	at org.junit.runners.ParentRunner.runChildren(ParentRunner.java:288)
	at org.junit.runners.ParentRunner.access$000(ParentRunner.java:58)
	at org.junit.runners.ParentRunner$2.evaluate(ParentRunner.java:268)
	at org.junit.runners.ParentRunner.run(ParentRunner.java:363)
	at org.junit.runner.JUnitCore.run(JUnitCore.java:137)
	at org.junit.runner.JUnitCore.run(JUnitCore.java:115)
	at org.junit.runner.JUnitCore.runMain(JUnitCore.java:77)
	at org.junit.runner.JUnitCore.main(JUnitCore.java:36)

FAILURES!!!
Tests run: 6,  Failures: 1
The output lists each of the test cases that ran, along with a summary of the test results. The long stacktrace indicates the sequence of method calls that let to the test case failure.
If NO tests failed, then your output would look similar to the following:
JUnit version 4.12
.....
Time: 0.008

OK (5 tests)
White Box Testing: Test Requirements
We start by testing the requirements of the method, which means we are
testing the main functionality of the method. For
Paycheck.calculateRegularPay(), the main functionality is that the
method will return the employee’s regular pay for the given pay rate and
hours worked. The code for Paycheck.calculateRegularPay() is in Figure 5.
    /**
     * Returns the employee's regular pay for the hours worked up to the first
     * REGULAR_PAY_MAX_HOURS hours worked.
     *
     * @param payRate employee's pay rate
     * @param hoursWorked number of hours worked by the employee
     * @return employee's regular pay
     */
    public static int calculateRegularPay(int payRate, double hoursWorked) {
        if (hoursWorked > REGULAR_PAY_MAX_HOURS) {
            return payRate * REGULAR_PAY_MAX_HOURS;
        }
        return (int) (payRate * hoursWorked);
    }
Figure 5: Implementation of the calculateRegularPay method in the Paycheck program.
A simple test is shown in Figure 6, below. Note that each piece of test
information is listed so that the information will be printed by the
testResult() method. The description is a String version of the method
call that generates the actual result for the test. Since the
Paycheck.calculateRegularPay() method returns a int, the result is
concatenated to the empty String to generate a String output for the
actual results.
    /**
     * Test the Paycheck.calculateRegularPay() method.
     */
    @Test
    public void testCalculateRegularPay() {
        // Less than 40 hours
        // Regular Level 1 36 hours
        assertEquals("Paycheck.calculateRegularPay(Paycheck.LEVEL_1_PAY_RATE, 36)", 68400,
                        Paycheck.calculateRegularPay(Paycheck.LEVEL_1_PAY_RATE, 36));
    }
Figure 6: Requirement test for Paycheck.calculateRegularPay() in PaycheckTest.
White Box Testing: Test Equivalence Classes
The strategy of testing representative values from equivalence classes
still applies to white box testing. We break up the possible inputs for
each parameter into equivalence classes and test representative values
for each parameter. There are two parameters for
Paycheck.calculateRegularPay(): the pay rate and the hours worked. For
the hours worked, the equivalence classes are hours less than 0, hours
between 0 and 40, and hours greater than 40. Since we are focusing on
representative values, we can choose values that are away from 40. Good
representative values would be 36 and 46, shown in Figure 7.
    /**
     * Test the Paycheck.calculateRegularPay() method.
     */
    @Test
    public void testCalculateRegularPay() {
        // Less than 40 hours
        // Regular Level 1 36 hours
        assertEquals("Paycheck.calculateRegularPay(Paycheck.LEVEL_1_PAY_RATE, 36)", 68400,
                        Paycheck.calculateRegularPay(Paycheck.LEVEL_1_PAY_RATE, 36));

        // Over 40 hours
        // Regular Level 1 46 hours
        assertEquals("Paycheck.calculateRegularPay(Paycheck.LEVEL_1_PAY_RATE, 46)", 76000,
                        Paycheck.calculateRegularPay(Paycheck.LEVEL_1_PAY_RATE, 46));
    }
Figure 7: Equivalence class tests for Paycheck.calculateRegularPay() in PaycheckTest.
White Box Testing: Test Boundary Values
Once representative values of a method are tested, boundary values
between the equivalence classes (if there are boundary values) should be
tested. For Paycheck.calculateRegularPay(), there are two boundaries: 1)
at 0 hours and 2) at 40 hours. We’ll focus on the boundary at 40. There
are three tests to consider: 39 hours, 40 hours, and 41 hours. These
correspond to the standard boundary value tests of at the boundary, one
less than the boundary, and one more than the boundary. The boundary
value tests are shown in Figure 8. Similar tests should be done for the
lower boundaries.
    /**
     * Test the Paycheck.calculateRegularPay() method.
     */
    @Test
    public void testCalculateRegularPay() {
        // Testing boundary
        // Less than 40 hours
        // Regular Level 1 39 hours
        assertEquals("Paycheck.calculateRegularPay(Paycheck.LEVEL_1_PAY_RATE, 39)", 74100,
                        Paycheck.calculateRegularPay(Paycheck.LEVEL_1_PAY_RATE, 39));

        // Regular Level 1 40 hours
        assertEquals("Paycheck.calculateRegularPay(Paycheck.LEVEL_1_PAY_RATE, 40)", 76000,
                        Paycheck.calculateRegularPay(Paycheck.LEVEL_1_PAY_RATE, 40));

        // Over 40 hours
        // Regular Level 1 41 hours
        assertEquals("Paycheck.calculateRegularPay(Paycheck.LEVEL_1_PAY_RATE, 41)", 76000,
                        Paycheck.calculateRegularPay(Paycheck.LEVEL_1_PAY_RATE, 41));
    }
Figure 8: Boundary value tests for Paycheck.calculateRegularPay() in PaycheckTest.
White Box Testing: Test All Paths
Since the code under test is known, the code may be used to guide writing unit or integration tests for a method. One testing strategy is to ensure that every path in the method has been executed at least once. We can determine all of the valid paths, called the basis set, through a method and write a test for each one. Using equivalence classes to drive white box testing should identify most of the possible paths through a method. Supplementing equivalence class testing with information about the possible paths ensures that all statements in the method are executed at least once and increases confidence that the method works correctly.
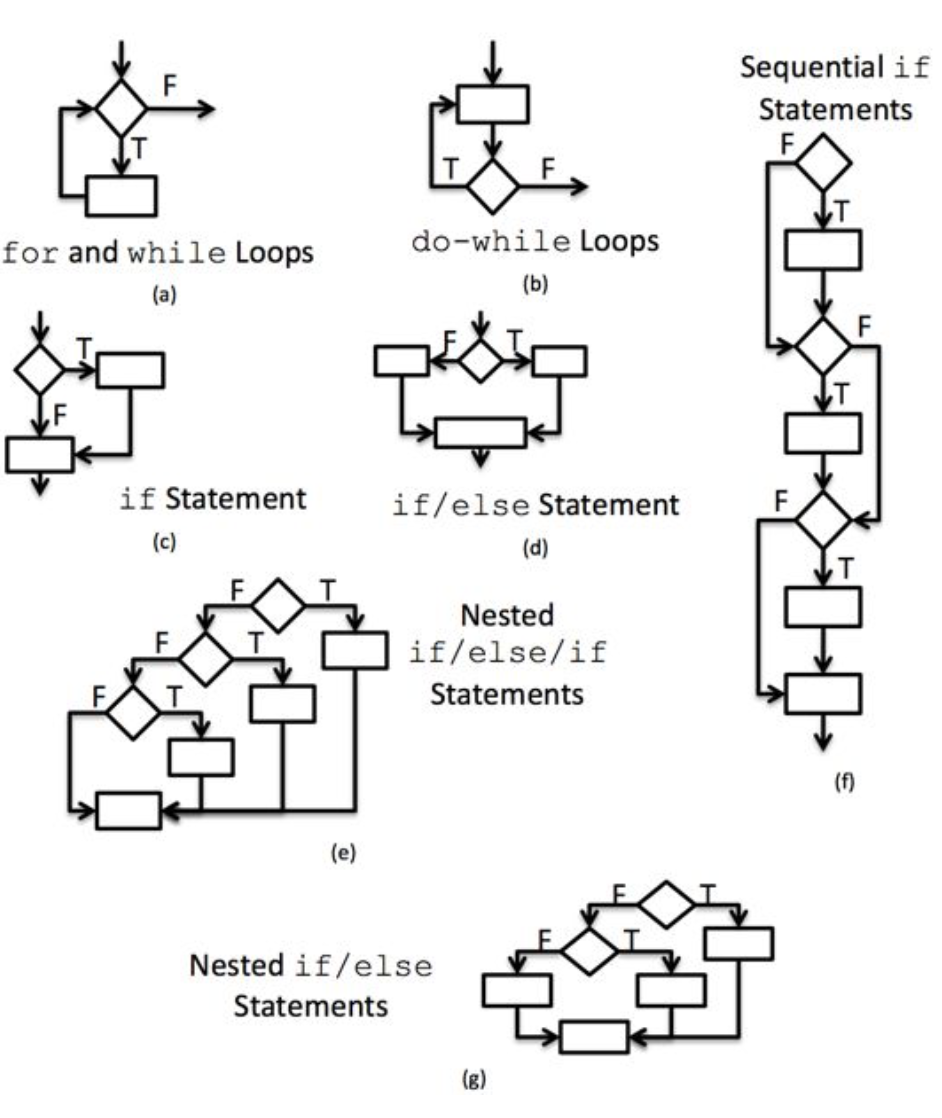
When performing white-box testing we are interested in the control flow
of the program. The control flow is a graph that contains decision
points and executed statements. Each decision (conditional test in an if
statement) in the method is shown as a diamond. The statements are in
rectangles.
There are standard templates for each of the control structures that make decisions in our code. These templates are provided in Figure 9, a-g.
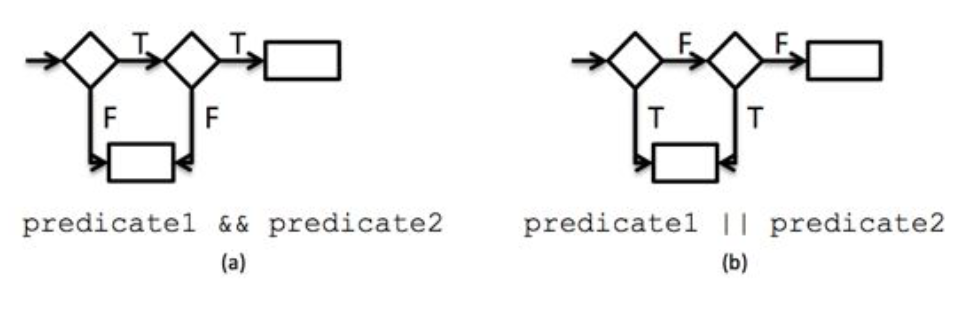
If the if statement contains compound conditional tests (i.e., the
conditional tests are separated by && or ||), then each conditional test
within the compound statement is shown as a separate diamond. Figure
10a-b shows standard templates for conditional statements with compound
predicates. Figure 10a shows two predicates that are and-ed together.
Both statements have to true for the statement on the right to execute.
If either predicate is false, then the inner portion of the conditional
test will never execute. Figure 10b shows two predicates that are or-ed
together. Either statement can be true for the body of the conditional
(represented by the lower statement) to execute. If both statements are
false, then the body of the conditional test never executes.
A measure called cyclomatic complexity provides a guide for the number of possible paths through the code. When creating white box tests, we want to create a test case for each possible path through the code. There are several calculations for cyclomatic complexity, but the easiest is to add one to the number of decision nodes (diamonds) in the control flow graph. Cyclomatic complexity provides us with the upper bound of the number of tests that we should write to guarantee full execution of the method if the tests are chosen appropriately such that they cover the paths. That is the minimum set of test cases that we should write just for execution of all conditionals on their true and false paths. However, one or more of the paths may be invalid. If a program requires that the same conditional predicate is used in two sequential if statements, that predicate will always evaluate the same as long as there is no change to the value. The path where one predicate would first evaluate true and the second predicate would evaluate to false can never occur. That’s why cyclomatic complexity is an estimate of the number of tests that you need for a method.
Once we have possible paths, we can create input values that will test each of the paths. Creating tests to consider all paths of statements is straightforward. Creating tests to consider all paths of loops is more complex. We could create many more paths that would execute the loop more than once, leading to a potentially infinite number of test cases. There is typically not enough time to run all possible test cases, so only focus on the paths through the code where a loop is run once through its body.
Pressman5 provides the following guidance for testing a simple loop
(i.e., no nesting), where the loop is expected to iterate n times.
- Fail the conditional test for entering the loop, so that the loop never executes;
- Execute the body of the loop only once;
- Execute the body of the loop twice;
- Execute the body of the loop
mtimes, wherem < n; - Execute the body of the loop
n – 1times; - Execute the body of the loop
ntimes; and - Execute the body of the loop
n + 1times.
A loop’s execution ranges from the lower boundary to n. The first set
of three test cases test the loop’s lower boundary value. The 4th test
case is a representative equivalence class test of the loop’s input
range. The last 3 test cases test loop’s upper boundary value. Some of
the tests may lead to redundancies if the loop’s bounds are dependent on
the input, so create as many distinct tests as possible, ensuring at a
minimum coverage of all paths through the loop.
Nested loops introduce additional complexity when testing. Pressman5 gives the following guidance for testing nested loops:
- Keeping all outer loops to minimal values that reduce the number of iterations, test the innermost loop using the techniques listed above.
- Move up the level of nested loops, and test the loop using the techniques listed above. The outer loops should kept to minimal iterations and any inner loops should be iterated a “typical” number of times.
- Continue moving up the level of nested loops until all loops are tested.
We will now use the test all paths strategy to test
Paycheck.calculateRegularPay(). The control flow diagram for
Paycheck.calculateRegularPay() is shown in Figure 11.
control-flow-calculateRegularPay.png
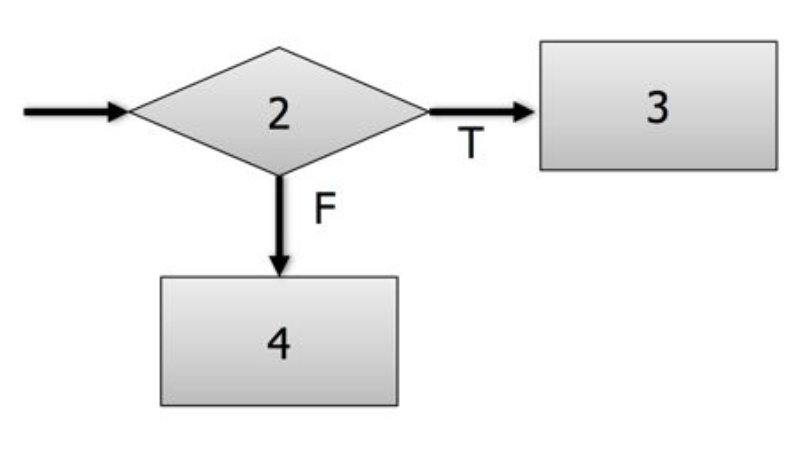
The cyclomatic complexity of Paycheck.calculateRegularPay() is 1 diamond + 1 = 2. This implies that there are as many as 2 valid paths through
the method. The possible paths are:
- 2-3
- 2-4
The tests shown in Figure 6 and Figure 7 cover the two valid paths for
the Paycheck.calculateRegularPay() method. Identifying the basis set of
tests for a method can help identify requirements and equivalence class
tests for a method. However, be careful about only considering valid
paths in your code! If your code is missing functionality, you will not
write tests for that. You should always think about requirements and
equivalence classes when writing unit tests.
White Box Testing: Testing Exceptions
Some paths through code will contain conditions that result in the throwing of an exception. Tests should be written to test that the exceptions are thrown.
For testing exceptions, we will examine testing a factorial method (Figure 12) that is contained within a Factorial class.
    /**
     * Calculates the factorial of n
     *
     * @param n number to calculate factorial of
     * @return n factorial (n!)
     * @throws IllegalArgumentException if n < 0
     */
    public static int factorial(int n) {
        if (n < 0) {
            throw new IllegalArgumentException("negative n");
        }
        int product = 1;
        for (int i = 2; i <= n; i++) {
            product *= i;
        }
        return product;
    }
Figure 12: factorial method that contains throwing an exception
To get the actual result, we will use a try/catch structure to examine whether the correct exception is thrown with the correct message. Code for the white-box test is given in Figure 13.
    /**
     * Test the Factorial.factorial() method.
     */
    @Test
    public void testFactorial() {
        try {
            Factorial.factorial(-4);
            fail();
        } catch (IllegalArgumentException e) {
            assertEquals("negative n", e.getMessage());
        }
    }
Figure 13: Code testing exception
Summary
Testing is an important part of the software development process and helps increase our confidence that our software meets the requirements set out by the customer (or your instructor). Systematic application of the strategies presented in this document will help you create a suite of test cases that will efficiently test your code. Black box testing is used to test the program as a whole by specifying program inputs and checking the generated outputs with the expected values. Black box testing should be completed along with white box testing. White box testing uses the source code to guide the development of test cases. Writing test cases for each method is a specific type of white box testing called unit testing. White box test cases can be written in another Java program, which allows for the automation of your testing efforts. Overall, testing is a technique that identifies underlying program faults by exercising the program you have developed.
Appendix
This example tests through Control Structures/Conditionals of the course textbook (Reges & Stepp, Chapter 47).
-
Systems and software engineering – Vocabulary. (2010). ISO/IEC/IEEE 24765:2010(E), 1–418. https://doi.org/10.1109/IEEESTD.2010.5733835 ↩ ↩2 ↩3
-
ISO/IEC TR 19759:2005. Software Engineering – Guide to the Software Engineering Body of Knowledge (SWEBOK). ↩
-
Throughout the Testing materials, the term “project” refers to any program assignment, including projects and exercises. ↩
-
To view the contents of a directory along with the contents of its subdirectories, you can use the
-Roption ofls:ls -R↩ -
Pressman, R. S. (2005). Software Engineering: A Practitioner’s Approach (6th ed.). McGraw-Hill. ↩ ↩2 ↩3 ↩4 ↩5
-
For this course, you are expected to use the assert methods that include message. Your message will include your test description. ↩
-
Reges, S., & Stepp, M. (2016). Building Java Programs: A Back to Basics Approach (4th ed.). Addison-Wesley. ↩